0 异步调用与MQ
异步调用方式其实就是基于消息通知的方式,一般包含三个角色:
- 消息发送者:投递消息的人,就是原来的调用方
- 消息Broker:管理、暂存、转发消息
- 消息接收者:接收和处理消息的人,就是原来的服务提供方
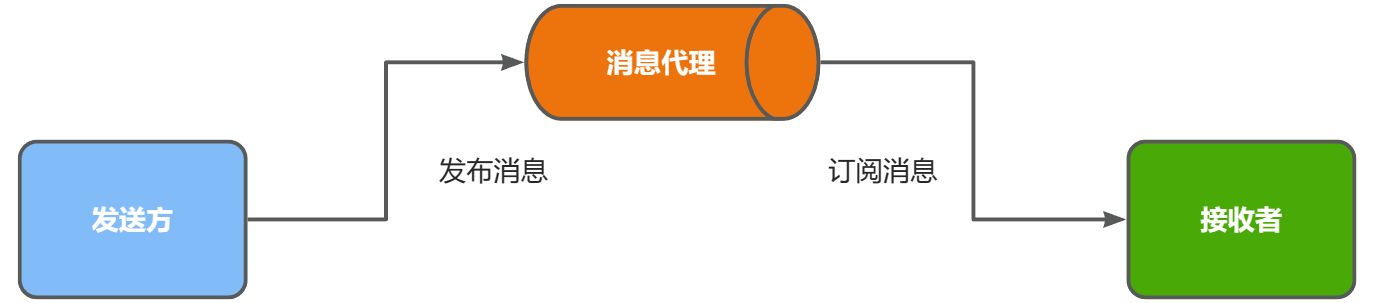
在异步调用中,发送者不再直接同步调用接收者的业务接口,而是发送一条消息投递给消息Broker。然后接收者根据自己的需求从消息Broker那里订阅消息。每当发送方发送消息后,接受者都能获取消息并处理。
这样,发送消息的人和接收消息的人就完全解耦了。
综上,异步调用的优势包括:
- 耦合度更低
- 性能更好
- 业务拓展性强
- 故障隔离,避免级联失败
当然,异步通信也并非完美无缺,它存在下列缺点:
- 完全依赖于Broker的可靠性、安全性和性能
- 架构复杂,后期维护和调试麻烦
消息Broker,目前常见的实现方案就是消息队列(MessageQueue),简称为MQ.
| 特性 | ActiveMQ | RabbitMQ | RocketMQ | Kafka |
|---|
| 开发语言 | java | erlang | java | scala |
| 单机吞吐量 | 万级 | 万级 | 10万级 | 100万级 |
| 时效性 | ms | us | ms | ms级以内 |
| 可用性 | 高(主从) | 高(主从) | 非常高(分布式) | 非常高(分布式) |
| 功能特性 | 成熟的产品、较全的文档、各种协议支持好 | 并发能力强、性能好、延迟低 | MQ功能比较完善,扩展性佳 | 只支持主要的MQ功能,主要应用于大数据领域 |
| 消息中间件 | 建议 |
|---|
| Kafka | 追求高吞吐量,适合产生大量数据的互联网服务的数据收集业务 |
| RocketMQ | 可靠性要求很高的金融互联网领域,稳定性高,经历了多次阿里双11考验 |
| RabbitMQ | 性能较好,社区活跃度高,数据量没有那么大,优先选择功能比较完备的RabbitMQ |
1 Rabbit MQ快速上手
RabbitMQ是基于Erlang语言开发的开源消息通信中间件,官网Messaging that just works — RabbitMQ
step1、安装与部署
 1
 2
 3
 4
 5
 6
 7
 8
 9
10
11
| docker run \
-e RABBITMQ_DEFAULT_USER=admin \
-e RABBITMQ_DEFAULT_PASS=abc123 \
-v mq-plugins:/plugins \
--name mq \
--hostname mq \
-p 15672:15672 \
-p 5672:5672 \
--network hmall \
-d \
rabbitmq:3.8-management
|
在安装命令中有两个映射的端口:
- 15672:RabbitMQ提供的管理控制台的端口
- 5672:RabbitMQ的消息发送处理接口
安装完成后,我们访问 http://localhost:15672即可看到管理控制台。首次访问需要登录,默认的用户名和密码在配置文件中已经指定了。
登录后即可看到管理控制台总览页面。RabbitMQ架构图如下:
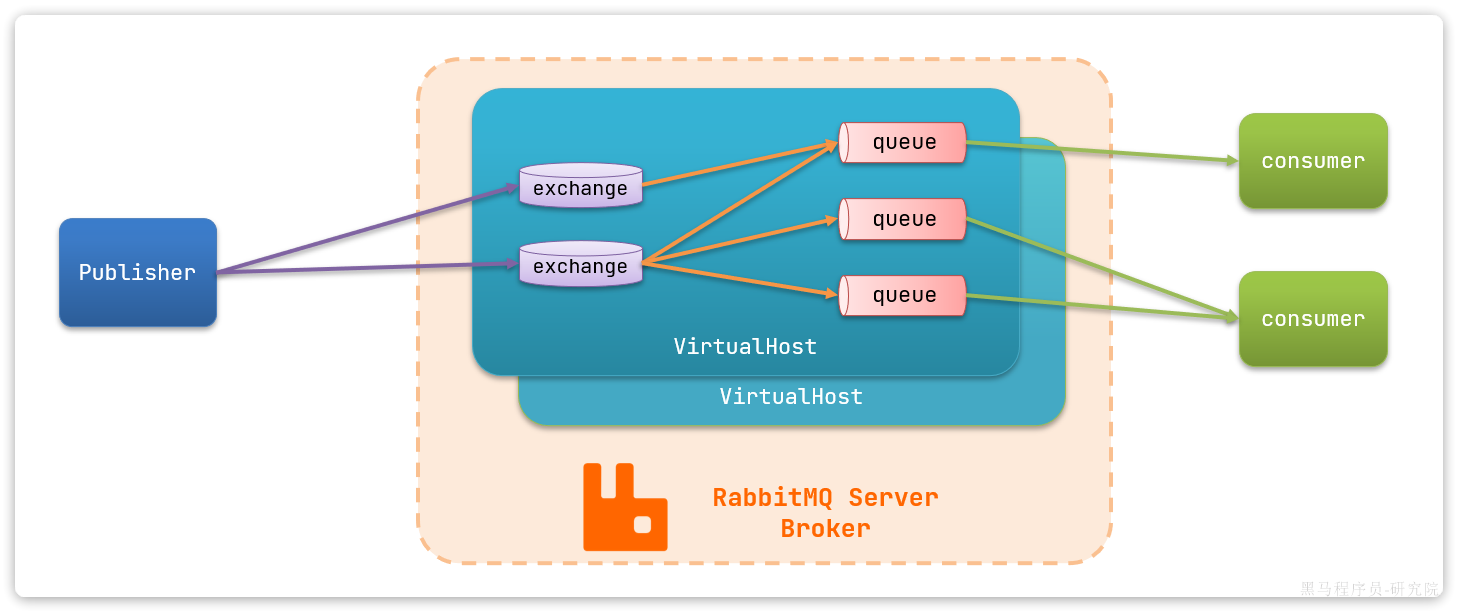
publisher:生产者,也就是发送消息的一方consumer:消费者,也就是消费消息的一方queue:队列,存储消息。生产者投递的消息会暂存在消息队列中,等待消费者处理exchange:交换机,负责消息路由。生产者发送的消息由交换机决定投递到哪个队列。virtual host:虚拟主机,起到数据隔离的作用。每个虚拟主机相互独立,有各自的exchange、queue
step2、导入SpringAMQP依赖
SpringAmqp的官方地址:Spring AMQP
SpringAMQP提供了三个功能:
- 自动声明队列、交换机及其绑定关系
- 基于注解的监听器模式,异步接收消息
- 封装了RabbitTemplate工具,用于发送消息
1
2
3
4
5
| <!--AMQP依赖,包含RabbitMQ-->
<dependency>
<groupId>org.springframework.boot</groupId>
<artifactId>spring-boot-starter-amqp</artifactId>
</dependency>
|
step3、发送消息
1
2
3
4
5
6
7
| spring:
rabbitmq:
host: 192.168.100.100 # 你的虚拟机IP
port: 5672 # 端口
virtual-host: /hmall # 虚拟主机
username: admin # 用户名
password: 123 # 密码
|
 1
 2
 3
 4
 5
 6
 7
 8
 9
10
11
12
13
14
15
16
| @SpringBootTest
public class SpringAmqpTest {
@Autowired
private RabbitTemplate rabbitTemplate;
@Test
public void testSimpleQueue() {
// 队列名称
String queueName = "simple.queue";
// 消息
String message = "hello, spring amqp!";
// 发送消息
rabbitTemplate.convertAndSend(queueName, message);
}
}
|
step4、接受消息
1
2
3
4
5
6
7
| spring:
rabbitmq:
host: 192.168.100.100 # 你的虚拟机IP
port: 5672 # 端口
virtual-host: /hmall # 虚拟主机
username: admin # 用户名
password: 123 # 密码
|
 1
 2
 3
 4
 5
 6
 7
 8
 9
10
| @Component
public class SpringRabbitListener {
// 利用RabbitListener来声明要监听的队列信息
// 将来一旦监听的队列中有了消息,就会推送给当前服务,调用当前方法,处理消息。
// 可以看到方法体中接收的就是消息体的内容
@RabbitListener(queues = "simple.queue")
public void listenSimpleQueueMessage(String msg) throws InterruptedException {
System.out.println("spring 消费者接收到消息:【" + msg + "】");
}
}
|
2 其他参数
- 能者多劳
1
2
3
4
5
| spring:
rabbitmq:
listener:
simple:
prefetch: 1 # 每次只能获取一条消息,处理完成才能获取下一个消息
|
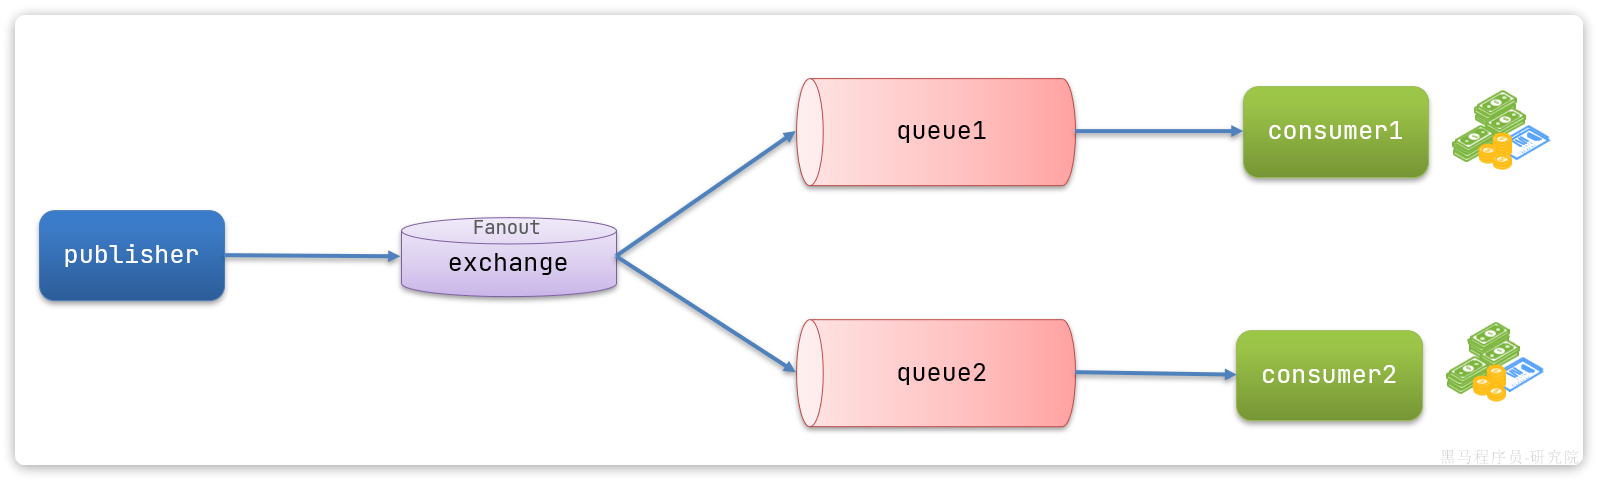
- Fanout交换机
- Direct交换机
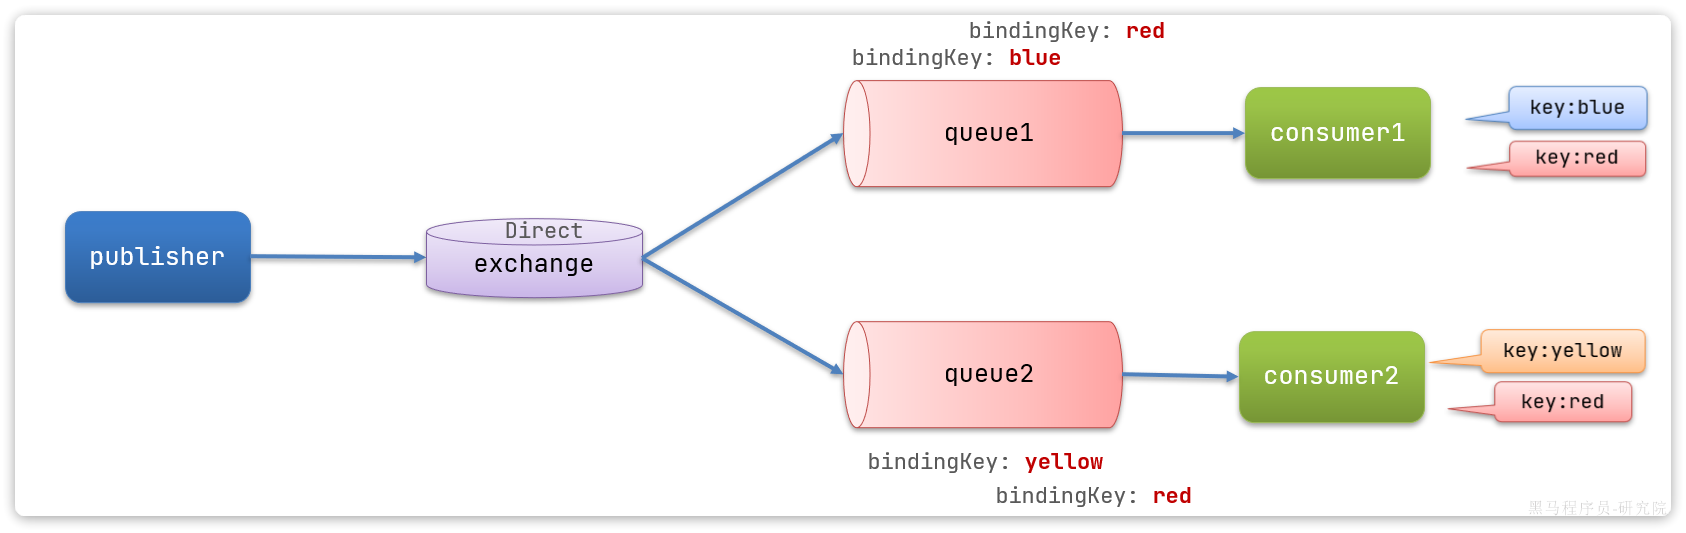
- Topic交换机
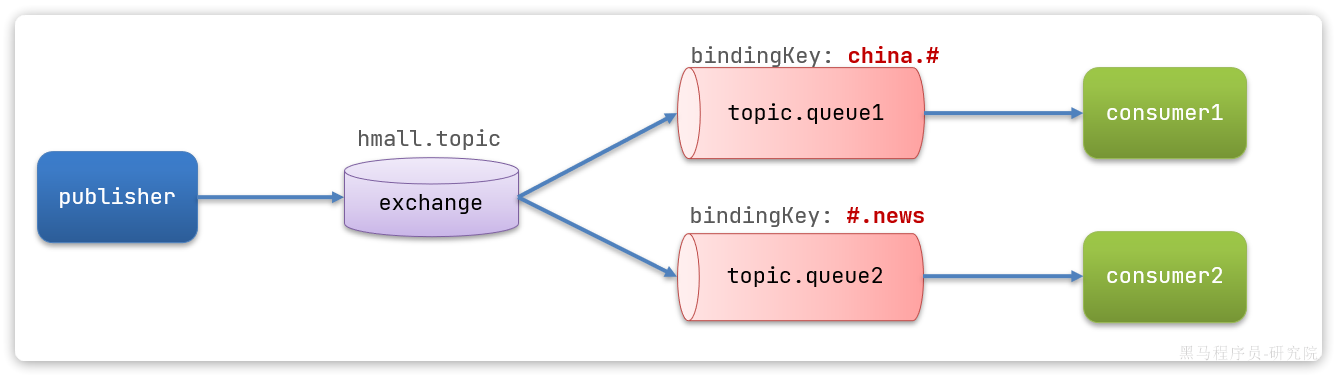
通配符规则:
举例:
item.#:能够匹配item.spu.insert 或者 item.spuitem.*:只能匹配item.spu
- bean方式声明
 1
 2
 3
 4
 5
 6
 7
 8
 9
10
11
12
13
14
15
16
17
18
19
20
21
22
23
24
25
26
27
28
29
30
31
32
33
34
35
36
37
38
39
40
41
42
43
| @Configuration
public class FanoutConfig {
/**
* 声明交换机
* @return Fanout类型交换机
*/
@Bean
public FanoutExchange fanoutExchange(){
return new FanoutExchange("hmall.fanout");
}
/**
* 第1个队列
*/
@Bean
public Queue fanoutQueue1(){
return new Queue("fanout.queue1");
}
/**
* 绑定队列和交换机
*/
@Bean
public Binding bindingQueue1(Queue fanoutQueue1, FanoutExchange fanoutExchange){
return BindingBuilder.bind(fanoutQueue1).to(fanoutExchange);
}
/**
* 第2个队列
*/
@Bean
public Queue fanoutQueue2(){
return new Queue("fanout.queue2");
}
/**
* 绑定队列和交换机
*/
@Bean
public Binding bindingQueue2(Queue fanoutQueue2, FanoutExchange fanoutExchange){
return BindingBuilder.bind(fanoutQueue2).to(fanoutExchange);
}
}
|
 1
 2
 3
 4
 5
 6
 7
 8
 9
10
11
12
13
14
15
16
17
18
19
20
21
22
23
24
25
26
27
28
29
30
31
32
33
34
35
36
37
38
39
40
41
42
43
44
45
46
47
48
49
50
51
52
53
54
55
56
57
58
| @Configuration
public class DirectConfig {
/**
* 声明交换机
* @return Direct类型交换机
*/
@Bean
public DirectExchange directExchange(){
return ExchangeBuilder.directExchange("hmall.direct").build();
}
/**
* 第1个队列
*/
@Bean
public Queue directQueue1(){
return new Queue("direct.queue1");
}
/**
* 绑定队列和交换机
*/
@Bean
public Binding bindingQueue1WithRed(Queue directQueue1, DirectExchange directExchange){
return BindingBuilder.bind(directQueue1).to(directExchange).with("red");
}
/**
* 绑定队列和交换机
*/
@Bean
public Binding bindingQueue1WithBlue(Queue directQueue1, DirectExchange directExchange){
return BindingBuilder.bind(directQueue1).to(directExchange).with("blue");
}
/**
* 第2个队列
*/
@Bean
public Queue directQueue2(){
return new Queue("direct.queue2");
}
/**
* 绑定队列和交换机
*/
@Bean
public Binding bindingQueue2WithRed(Queue directQueue2, DirectExchange directExchange){
return BindingBuilder.bind(directQueue2).to(directExchange).with("red");
}
/**
* 绑定队列和交换机
*/
@Bean
public Binding bindingQueue2WithYellow(Queue directQueue2, DirectExchange directExchange){
return BindingBuilder.bind(directQueue2).to(directExchange).with("yellow");
}
}
|
- 注解式声明
 1
 2
 3
 4
 5
 6
 7
 8
 9
10
11
12
13
14
15
16
17
| @RabbitListener(bindings = @QueueBinding(
value = @Queue(name = "direct.queue1"),
exchange = @Exchange(name = "hmall.direct", type = ExchangeTypes.DIRECT),
key = {"red", "blue"}
))
public void listenDirectQueue1(String msg){
System.out.println("消费者1接收到direct.queue1的消息:【" + msg + "】");
}
@RabbitListener(bindings = @QueueBinding(
value = @Queue(name = "direct.queue2"),
exchange = @Exchange(name = "hmall.direct", type = ExchangeTypes.DIRECT),
key = {"red", "yellow"}
))
public void listenDirectQueue2(String msg){
System.out.println("消费者2接收到direct.queue2的消息:【" + msg + "】");
}
|
- 配置消息转换器
1
2
3
4
5
6
| <!--引入依赖-->
<dependency>
<groupId>com.fasterxml.jackson.dataformat</groupId>
<artifactId>jackson-dataformat-xml</artifactId>
<version>2.9.10</version>
</dependency>
|
1
2
3
4
5
6
7
8
| @Bean
public MessageConverter messageConverter(){
// 1.定义消息转换器
Jackson2JsonMessageConverter jackson2JsonMessageConverter = new Jackson2JsonMessageConverter();
// 2.配置自动创建消息id,用于识别不同消息,也可以在业务中基于ID判断是否是重复消息
jackson2JsonMessageConverter.setCreateMessageIds(true);
return jackson2JsonMessageConverter;
}
|
3 进阶参数
- 生产者重试机制
1
2
3
4
5
6
7
8
9
| spring:
rabbitmq:
connection-timeout: 1s # 设置MQ的连接超时时间
template:
retry:
enabled: true # 开启超时重试机制
initial-interval: 1000ms # 失败后的初始等待时间
multiplier: 1 # 失败后下次的等待时长倍数,下次等待时长 = initial-interval * multiplier
max-attempts: 3 # 最大重试次数
|
- 生产者确认机制
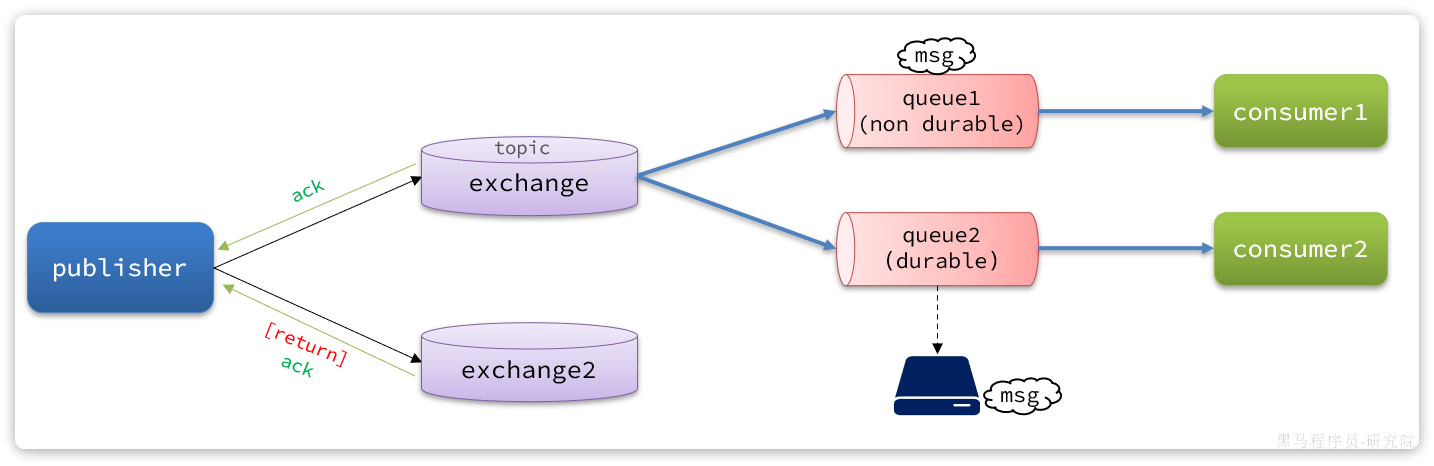
- 当消息投递到MQ,但是路由失败时,通过Publisher Return返回异常信息,同时返回ack的确认信息,代表投递成功
- 临时消息投递到了MQ,并且入队成功,返回ACK,告知投递成功
- 持久消息投递到了MQ,并且入队完成持久化,返回ACK ,告知投递成功
- 其它情况都会返回NACK,告知投递失败
1
2
3
4
| spring:
rabbitmq:
publisher-confirm-type: correlated # 开启publisher confirm机制,并设置confirm类型 none关闭confirm机制\simple同步阻塞等待MQ的回执\correlated MQ异步回调返回回执
publisher-returns: true # 开启publisher return机制
|
 1
 2
 3
 4
 5
 6
 7
 8
 9
10
11
12
13
14
15
16
17
18
19
20
21
22
| // Return callback
@Slf4j
@AllArgsConstructor
@Configuration
public class MqConfig {
private final RabbitTemplate rabbitTemplate;
@PostConstruct
public void init(){
rabbitTemplate.setReturnsCallback(new RabbitTemplate.ReturnsCallback() {
@Override
public void returnedMessage(ReturnedMessage returned) {
log.error("触发return callback,");
log.debug("exchange: {}", returned.getExchange());
log.debug("routingKey: {}", returned.getRoutingKey());
log.debug("message: {}", returned.getMessage());
log.debug("replyCode: {}", returned.getReplyCode());
log.debug("replyText: {}", returned.getReplyText());
}
});
}
}
|
 1
 2
 3
 4
 5
 6
 7
 8
 9
10
11
12
13
14
15
16
17
18
19
20
21
22
23
24
25
| // confirm callback
@Test
void testPublisherConfirm() {
// 1.创建CorrelationData
CorrelationData cd = new CorrelationData();
// 2.给Future添加ConfirmCallback
cd.getFuture().addCallback(new ListenableFutureCallback<CorrelationData.Confirm>() {
@Override
public void onFailure(Throwable ex) {
// 2.1.Future发生异常时的处理逻辑,基本不会触发
log.error("send message fail", ex);
}
@Override
public void onSuccess(CorrelationData.Confirm result) {
// 2.2.Future接收到回执的处理逻辑,参数中的result就是回执内容
if(result.isAck()){ // result.isAck(),boolean类型,true代表ack回执,false 代表 nack回执
log.debug("发送消息成功,收到 ack!");
}else{ // result.getReason(),String类型,返回nack时的异常描述
log.error("发送消息失败,收到 nack, reason : {}", result.getReason());
}
}
});
// 3.发送消息
rabbitTemplate.convertAndSend("hmall.direct", "q", "hello", cd);
}
|
交换机、队列、消息持久化
Lazy Queue
1
2
3
4
5
6
7
| @Bean
public Queue lazyQueue(){
return QueueBuilder
.durable("lazy.queue")
.lazy() // 开启Lazy模式
.build();
}
|
1
2
3
4
5
6
7
8
| @RabbitListener(queuesToDeclare = @Queue(
name = "lazy.queue",
durable = "true",
arguments = @Argument(name = "x-queue-mode", value = "lazy")
))
public void listenLazyQueue(String msg){
log.info("接收到 lazy.queue的消息:{}", msg);
}
|
- 消费者确认机制
1
2
3
4
5
| spring:
rabbitmq:
listener:
simple:
acknowledge-mode: none # 不做处理 auto 自动模式 manual 手动模式
|
- 消费者失败重试机制
 1
 2
 3
 4
 5
 6
 7
 8
 9
10
| spring:
rabbitmq:
listener:
simple:
retry:
enabled: true # 开启消费者失败重试
initial-interval: 1000ms # 初识的失败等待时长为1秒
multiplier: 1 # 失败的等待时长倍数,下次等待时长 = multiplier * last-interval
max-attempts: 3 # 最大重试次数
stateless: true # true无状态;false有状态。如果业务中包含事务,这里改为false
|
- 开启本地重试时,消息处理过程中抛出异常,不会requeue到队列,而是在消费者本地重试
- 重试达到最大次数后,Spring会返回reject,消息会被丢弃
- 消费者失败处理策略
Spring允许我们自定义重试次数耗尽后的消息处理策略,这个策略是由MessageRecovery接口来定义的,它有3个不同实现:
RejectAndDontRequeueRecoverer:重试耗尽后,直接reject,丢弃消息。默认就是这种方式ImmediateRequeueMessageRecoverer:重试耗尽后,返回nack,消息重新入队RepublishMessageRecoverer:重试耗尽后,将失败消息投递到指定的交换机
比较优雅的一种处理方案是RepublishMessageRecoverer,失败后将消息投递到一个指定的,专门存放异常消息的队列,后续由人工集中处理。
 1
 2
 3
 4
 5
 6
 7
 8
 9
10
11
12
13
14
15
16
17
18
19
20
21
| @Configuration
@ConditionalOnProperty(name = "spring.rabbitmq.listener.simple.retry.enabled", havingValue = "true")
public class ErrorMessageConfig {
@Bean
public DirectExchange errorMessageExchange(){
return new DirectExchange("error.direct");
}
@Bean
public Queue errorQueue(){
return new Queue("error.queue", true);
}
@Bean
public Binding errorBinding(Queue errorQueue, DirectExchange errorMessageExchange){
return BindingBuilder.bind(errorQueue).to(errorMessageExchange).with("error");
}
@Bean
public MessageRecoverer republishMessageRecoverer(RabbitTemplate rabbitTemplate){
return new RepublishMessageRecoverer(rabbitTemplate, "error.direct", "error");
}
}
|
综上,支付服务与交易服务之间的订单状态一致性是如何保证的?

- 首先,支付服务会正在用户支付成功以后利用MQ消息通知交易服务,完成订单状态同步。
- 其次,为了保证MQ消息的可靠性,我们采用了生产者确认机制、消费者确认、消费者失败重试等策略,确保消息投递的可靠性
- 最后,我们还在交易服务设置了定时任务,定期查询订单支付状态。这样即便MQ通知失败,还可以利用定时任务作为兜底方案,确保订单支付状态的最终一致性。
- 死信交换机